~A pair of knitting needles (prefer a needle size 7, looks good with normal size yarn)
~Two different yarn color (colors that look good with each other, I like to use the color wheel as reference when trying to find other varieties)
~Graph paper/pen or pencil (to graph out certain fonts)
DON'T KNOW HOW TO BEGIN:
~Casting On
~Knit Stitch
~Purl Stitch
~Casting Off (try to get this part up asap, maybe tomorrow xD)
So not that you’ve got the basic (or at least I hope you did) lets start by graphing out the names, in this case I’ll be doing a Gackt one. [leave nice comments don't bash me, it's actually really hard to explain it into worlds T____TT ]


GRAPHING
So first off if you have a specific type font then it would be easier to print it out in a good font size and just trace over it on graph paper, making sure that the words get spelled out similar to the actual picture. If you really don’t care then you can just graph out the name.
(keep notice : just remember that your graph compared to your actually knitting piece will be smaller)
Each square on the graph is one stitch.
As to how I did it I just knit 3 then purl the other 14 then knit 3 again. But by doing that when your done your piece is going to curl inward so you need to counter it by purling 4 more stitches as so, you are going to be knitting 3 then knit 2 purl 14 knit 2 then knit 3. after going back on the needle the second time, it will be knit 3 purl 2 purl 14 purl 2 knit 3. So that that your purling stitch was face a different way then the main piece. WE ARE NOT DOING CABLE, it is just that they are carrying the yarn over, we are making it flat, therefore we don't need the cable needle. (confuse, watch video)


The border length varies depending on how big you plan to knit, just remember to be consistent in your work.
If you watch the first part then it should be easy to get started by knitting the borders and the pearls. But now it is time to add on the second color of yarn, this is when your graph comes into play.
EXAMPLE: So for Gackt - I’ll have 18 red stitches total for the letter G in his name.
~For my borders I like them to be the same size so if I started to knit the bottom length of 1cm then the borders when I start to pearl I’ll leave out 1cm on each side so that it’ll be even.


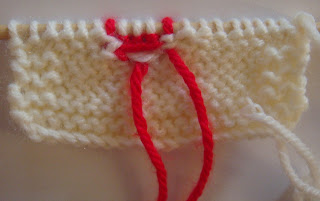
For me I just wrap the second yarn color without tying the knots, so if you are concern about the yarn being too loose or it may slip out. You can either
tie a slip knot on it before placing it on your knitting needle
leave a long amount of yarn when knitting it in
After getting that first piece of color in just knit along with your marked graph paper.
(helpful tips : cross the rows out that you’ve already done, you don’t want to sit there and undo them) trust me I’ve messed up before on my knitted sweater not fun to sit there, of course you can always pull the whole thing out but then you might lose your stitches when trying to put them back onto your needle.


Right after you knit in your second color, you need to carry your first color yarn over. So if it gets messy in the back and your seeing all these strands of yarn parallel to each other then your doing it right. (hehehe congrats :3)
Since it is so messy it is only good to do it for a sweater, a round scarf of some sort, or else you need to knit another layer or have some sort of fabric over it.


When you carried the yarn over it is the best that you don’t pull on it really tight or else when you’re done with the piece it will all bunch up at the end, making it curl up.
Best if you estimate how wide the piece will be that your carrying the yarn over.
It is the same thing over and over again till you get to the end just knit the whole piece regular getting the border you wanted and casting off.


2 comments:
Funny now that I check your blog, I realize you still blogging. In my blog, I just wrote something about my feeling. hahaha
I blog about random things :<
More of my activities now.
Post a Comment